다음 사이트에 접속한다.
Spring Initializr
Initializr generates spring boot project with just what you need to start quickly!


위와같이 설정한 후 GENERATE를 눌러 프로젝트를 생성한다.
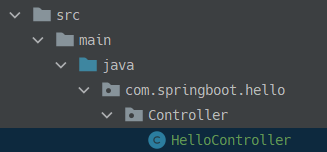
- 위와 같이 com.springboot.hello에 Controller 패키지를 생성한다.
- 이후 HelloController 클래스를 작성한다.
package com.springboot.hello.Controller;

import org.springframework.web.bind.annotation.RequestMapping;
import org.springframework.web.bind.annotation.RestController;

@RestController
public class HelloController {

    @RequestMapping("/hello")
    public String hello(){
        return "Hello World";
    }
}
그 다음 HellApplication을 실행하면 아래 다음과같이 뜬다.

이후 http://localhost:8080/hello 로 들어가 Hello World를 출력하는지 확인하자

Uploaded by N2T
'Programming > [Spring Boot]' 카테고리의 다른 글
| Swagger를 활용한 REST API 명세 문서화 (0) | 2023.01.25 |
|---|---|
| PUT/DELETE API 만들기 (1) | 2023.01.21 |
| POST API 만들기 (0) | 2023.01.20 |
| GET API 만들기 (0) | 2023.01.19 |
| Talend API Tester를 통해 동작 테스트를 해보자 (0) | 2023.01.19 |